This work-in-progress post shows the steps in making a YellowDog Art card. Well, in this specific case, a BrownDog card. My Mom requested this for my niece; BrownDog started at her house before finding her way to my parents house and my niece loves teddy bears. Easy peasy.
STEP 1: The recycled kraft cards I use come in two different sizes and they come unfolded but they do have a wonderful score line.
STEP 2: Using the score line provided on each card and a bone folder, I fold each card separately.
STEP 3: Next, I use a good pencil to sketch the image on the card. I sketch it very very lightly so it is easy to cover with ink or erase when the time comes.
STEP 4: Now I ink the card. I use a no bleed Sharpie to follow the pencils. Because I buy recycled cards in a heavier cardstock weight, the ink does not bleed through and it give me a nice strong line. When I am done inking the card, I wait a a few minutes and then carefully erase any left over pencil lines. I find the cheap $.35 pink pencil topper erasers from the art store work best.
STEP 5: I use Prisma Color pencils for color. They are very waxy and have a super smooth look. The colors are amazing. Some of the darker colors dont work great on these cards because they get a white waxy film after a while so I just avoid using the colors I find problematic. The picture below was actually taken after the pencil step was done and I had just started step 6. I thought it would work best this way so you could see how different the next step is even though it may sound unnecessary.
STEP 6: Reinking the entire image. Again, I use the no bleed Sharpie. It works the best over the waxy pencil. It really makes the image pop off the card. The white pencil outline helps to but the second round of outlining with the Sharpie really brings back all the definition. The waxy finish of the pencil can ruin markers but so far I find if I just scribble on a plain piece of paper every once in a while, I am good to go!
This is just a closer look at the final product. Sorry about the poor quality of the image. My lighting was not ideal. I really like how this came out! My first bear. After the card is done, I find its matching recycled kraft envelope and a clear cello bag for protection. The celo bag also helps keep the waxy film appear on the rare occasion I have to use one of those darker colors.
I know, I know. Printed cards would be sooo much easier. But how would I get this exact look in printed cards? Plus, I make my art to make art. Selling my art and items with my artwork on them just helps me get my art out there to anyone interested. It helps me recoup a small amount of the cost of supplies. I keep my prices as low as possible and I do have a day job so I can do this for now. Currently my recycled cards with envelope and original artwork are all only $5 each! Want a YellowDog card? Want a bunch of YellowDog cards? Contact me and we will work something out :)

 Remember the sprial bound watercolor pad I showed previously? I loved that pad of watercolor paper more than I thought I would! The paper was relatively smooth for cold pressed watercolor paper so my pens work great on it. And as watercolor paper should be, the paper was nice and thick. Add in the sprial binding and I officially love it! The only bummer is that there are not that many papers in each pad. Only 12 sheets per pad. So when I realized how great they were, I went back for more. They are not cheap and I found they come in a several different sizes so I just grabbed one more 7" x 10" and a 9" x 12". I have a feeling I will go through them pretty quickly but I can always go back for more.
  A wonderful friend of mine gave me a travel watercolor set years ago. Maybe 8 years ago? And it was so cute and so nice, I did not dare use it. I am terrible! I have finally given myself permission to use it. And I think that paid off in more ways than one. I got an email out of the blue from my friend, Lois, only two weeks after making that decision. We havent chatted in years! Anyway...exciting on all kinds of levels :)
  If you look closely at the pictures, you will see my newly found watercolor pads are the same exact brand as the travel watercolor set I was given years ago! They are practically a set! Cute, isnt it?! It is about 4" x 5" when closed and has a strong white case.
 It has a ton of pallette space and it came with a compact brush. I think I am going to use a water brush but it is very nice to have the back up brush. The water brush will be shown in a later post. I dont want to over excite you all. But the travel set is a bit too nice for me to just play with. Dont get me wrong, I will eventually play with it. I promise! No more horading it! It will be perfect to take to work with me so I can do a little arting during my 'lunch'.
 But that is where this set comes in. Remember this medium set I mentioned some time back? It is made by Paperchase and I got it at Borders with a coupon. It was only a little over $2.00. It too came with a brush but I still want to use that water brush.
  But then I stumbled upon this set at Michaels last weekend. It was the only one left. It is just an Artists' Loft brand set so Im not sure how great the quality will be but look at the colors!! I signed up for a new online workshop today and the artist uses a set that looks very sikilar to this one. And ofcourse I had a coupon so it was about $6.00. And it is huge! It does not matter what kind of paint I am using, I do not enjoy mixing my own colors so the more colors the better for me.
 Come on! Look at these colors! I have done a little playing already but I will save that for another post. I thought I would introduce you to the supplies first and THEN bore you with my attempts at watercolor painting.


 I wanted to try one of these for over a year. But they
  So when I was scouring through Borders one day this past winter, I was shocked and very very happy to see the orange 6" x 6" and the gold 8" x 8"
  I
I 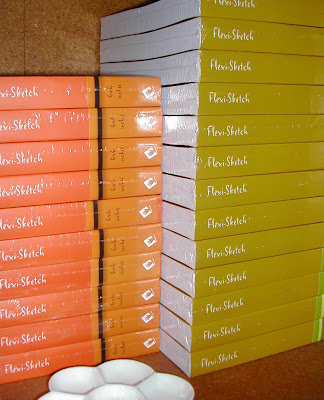 I can not wait to fill every one of these! Well, everyone but maybe one or two that I might give away. Who
  Above you see the first